You need a network router to let communication from your computer to the lasers. You can also use any device with integrated routing features.
Check you’ve got the proper ethernet cable for each laser. An ethernet CAT-5 cable (min.) is recommended
Check you've got an ILDA cable for each laser
Connection Scheme
- Switch on the router.
- Use a CAT-5 network cable to connect the computer with the router.
Attention: your router needs to have one free ethernet connector for each laser PLUS another one for your computer. If this is not possible then you'll need to attach a network switch to your router so you expand the available connectors. - For all the Lasers:
- USE the ILDA cable to connect ShowNET device (ILDA-OUT) to the laser (ILDA-IN).
- Plug in ShowNET device.
- Use a CAT-5 network cable to connect the computer with ShowNET device.

- You need to connect your computer with an ethernet cable. Wifi connection is not recommended, thus not supported in this guide.
- If your computer has both ethernet and wifi connection, you need to take care of this. We will show you how below.
- AutoIP configuration is not possible: the router may block this kind of communication and it may need some advanced tweaking to get it work, which is out of the scope of this manual.
 What's an IP address?
Any device connected to a network environment, such as computers, printers, smartphones and also lasers, no matter if it's a wired connection or wifi network, has a unique identification number. This unique address is the so called IP address.
The IP address type used for the communication with the laser systems consists of a group of 4 numbers (each between 0 and 255), separed by a point (".") symbol. It looks like this:
www.xxx.yyy.zzz
Schematics example of an IP/v4 address:

If devices shall communicate with each other, they need to reside in the same address range, which means that the first 3 numbers must be the same. The fourth number, however, must be unique for each device in the network.
In a home or office environment the computers and hardware components usually get these addresses assigned automatically by the so called DHCP server, which included in the utmost of routers or wifi access points. That's why it is usually not necessary to take care of setting these addresses manually. However, if there is no DHCP server available, the devices in a network either need to negotiate the suitable addresses for each device between each other (so called Auto IP) or they requrie static IP addresses the be manually set.
As there is usually no DHCP available at show production sites, laser show settings may require either Auto IP setting or static IP.
Show production companies tend to use static IPs, as then the address distribution does not depend on any additional communication between the devices in the network and each unit can be checked on more specifically through the network and various tools.
The IP address type used for the communication with the laser systems consists of a group of 4 numbers (each between 0 and 255), separed by a point (".") symbol. It looks like this:
www.xxx.yyy.zzz
Schematics example of an IP/v4 address:
If devices shall communicate with each other, they need to reside in the same address range, which means that the first 3 numbers must be the same. The fourth number, however, must be unique for each device in the network.
In a home or office environment the computers and hardware components usually get these addresses assigned automatically by the so called DHCP server, which included in the utmost of routers or wifi access points. That's why it is usually not necessary to take care of setting these addresses manually. However, if there is no DHCP server available, the devices in a network either need to negotiate the suitable addresses for each device between each other (so called Auto IP) or they requrie static IP addresses the be manually set.
As there is usually no DHCP available at show production sites, laser show settings may require either Auto IP setting or static IP.
Show production companies tend to use static IPs, as then the address distribution does not depend on any additional communication between the devices in the network and each unit can be checked on more specifically through the network and various tools.
Ok, I am getting into this. Now... what?
There are two options to configure the ShowNET devices and your computer in order to get them all connected:- Automatically: using DHCP features in your router.
- Manually: using a fixed IP address for each ShowNET device and for your computer.
DHCP(automatic mode)- Easy way to get it working fast
- You must know how your router works, and maybe need to check your router's manual
(click here)
DHCP
(automatic mode)
- Easy way to get it working fast
- You must know how your router works, and maybe need to check your router's manual
(click here)
Configure the IP address for each ShowNET-integrated device
This is the DIP switch panel configuration (don't panic):
Configuration is very straightforward: just need to put all DIP switches in OFF position.
If you don't know how to do it, check our guide below.
Configure the IP address for the computer
You need to configure your computer so it can get its IP address automatically.If you don't know how to do it, check our guide below.
How to configure the IP settings for the computer for DHCP use
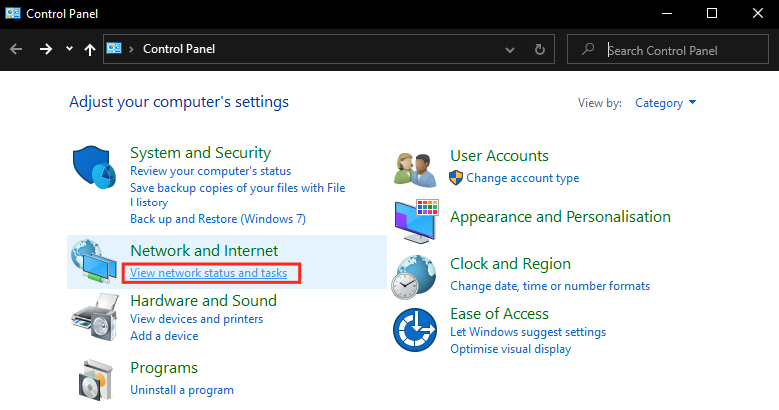
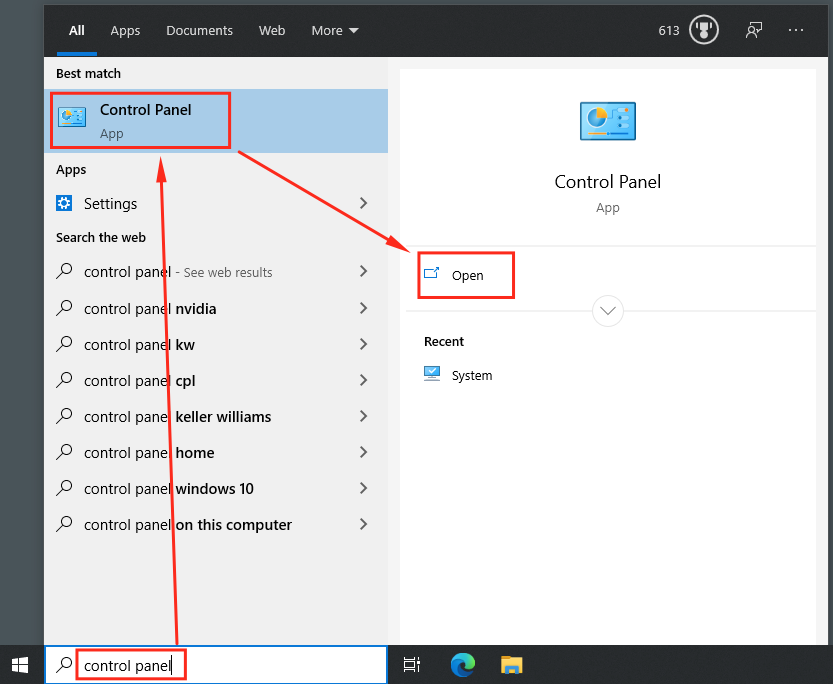
- Press the Windows-key and type "control panel" (without quotes; this can also be done througn the search bar) > Click on "Control Panel" > Click on Open.

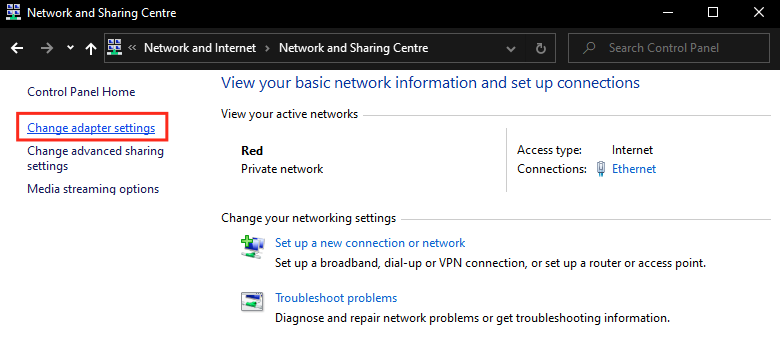
- Click on "View network status and tasks" under "Network & Internet".
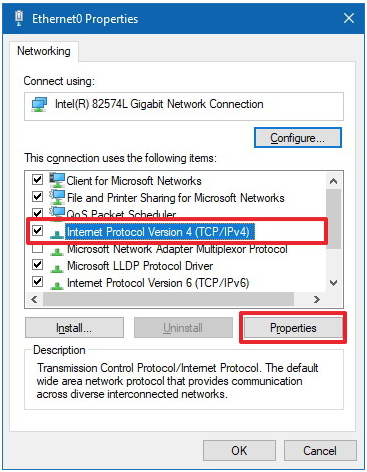
- Click on "Change adapter settings"

- Right click the network adapter > Click on "Properties".
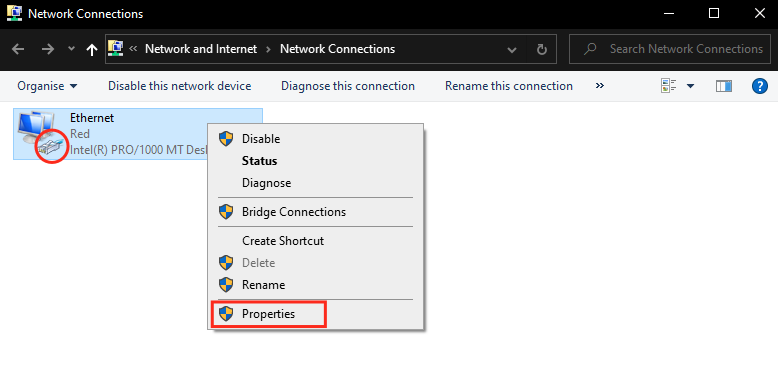
If there are multiple icons in this window, the correct one is usually labeled with "ethernet". It also should have the little network connector icon. Note that it may also have a red "X" if it's disconnected or not properly configured. - Select the Internet Protocol Version 4 (TCP/IPv4) option > click the "Properties button".
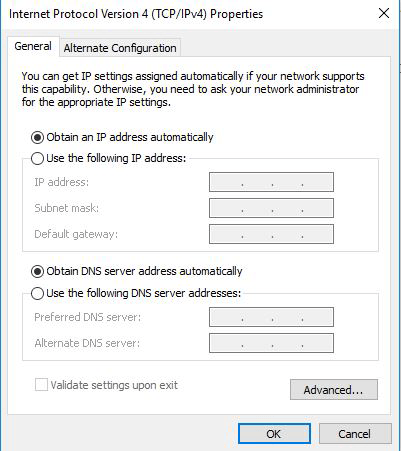
- Select "Obtain an IP address automatically" to let the computer receive the IP address from the DHCP.
FIXED IP(manual mode)- It takes a bit longer to get it configured
- You won't need to configure your router
(click here)
FIXED IP
(manual mode)
- It takes a bit longer to get it configured
- You won't need to configure your router
(click here)
There are some of the IP address list are reserved for our own private use (like the ones used at home).
For ShowNET configuration we have 4 possibilities:
- 192.168.0.XXX: This will let us use any IP from 192.168.0.50 to 192.168.0.65
- 192.168.1.XXX: This will let us use any IP from 192.168.1.50 to 192.168.1.65
- 192.168.2.XXX: This will let us use any IP from 192.168.2.50 to 192.168.2.65
- 192.168.254.XXX: This will let us use any IP from 192.168.254.50 to 192.168.254.65
Attention! If your computer has a wifi connection you should disconnect it to avoid interferences with our wired connection.
However, if you want to keep it one then you must be sure that the IP address used by your wifi is not on the same range as the IP address you will be using to connect to the ShowNET.
Determine IP addresses if Wifi and laser control shall work at the same time
To check on the IP addresses, click on the Wifi network icon in the taskbar > click the Wifi network you're connected to > Properties.

In Properties, look for the IP address listed next to IPv4 address.
Note: The first 3 numbers of the IP address (the address range, see schematcs) must be different for the wired connection to the laser. For example:
In Properties, look for the IP address listed next to IPv4 address.
Note: The first 3 numbers of the IP address (the address range, see schematcs) must be different for the wired connection to the laser. For example:
- Computer's Wifi has an IP of 192.168.0.X -> use any IP like 192.168.1.X or 192.168.2.X or 192.168.254.X
- Computer's Wifi has an IP of 192.168.1.X -> use any IP like 192.168.0.X or 192.168.2.X or 192.168.254.X
- Computer's Wifi has an IP of 192.168.2.X -> use any IP like 192.168.0.X or 192.168.1.X or 192.168.254.X
- Computer's Wifi has an IP of 192.168.254.X -> use any IP like 192.168.0.X or 192.168.1.X or 192.168.2.X
- Computer's Wifi has an IP of any other number different that 192.168.X.Y -> use any IP like 192.168.0.X or 192.168.1.X
Choosing the IP address
- Choose the IP address for each of your ShowNET-integrated Laser:
- The third number must be 0 or 1, and must be the same number for each ShowNET device.
- The fourth number must be anything from 50 to 65. You must choose a different number for each ShowNET device.
- Choose the IP address for the computer.
- The third number must be 0 or 1, and must be the same as the one of the ShowNET
- The fourth number must be anything from 1 to 254, except numbers from 50 to 65 (which are reserved for ShowNET)
Configure the IP address for the ShowNET
This is the DIP switch panel configuration (don't panic):
Configuration (put first all DIP switches in OFF position):
If you don't know how to do it, check our guide below.
- DIP Switch 7 must be always ON
- Setup the third number:
- If your chosen IP starts with 192.168.0: nothing changes
- If your chosen IP starts with 192.168.1: DIP Switch 5 must be ON
- If your chosen IP starts with 192.168.2: DIP Switch 6 must be ON
- If your chosen IP starts with 192.168.254: DIP Switches 5 & 6 must be ON
- Setup the fourth number (the one from 50 to 65): You need to configure DIP Switches 1, 2, 3 & 4 to ON position, checking the value on the table.
Some examples:
- 192.168.0.52: Set to ON switches 2 and 7
- 192.168.1.64: Set to ON switches 2, 3, 4, 5 and 7
- 192.168.2.50: Set to ON switches 6 and 7
- 192.168.254.54: Set to ON swithc 3, 5, 6 and 7
Configure the IP address for the computer
You need to configure the network address for your computer with the number you've chosen, as described in previous steps.If you don't know how to do it, check our guide below.
How to configure a static IP address for a computer
- Press the Windows-key and type "control panel" (without quotes; this can also be done througn the search bar) > Click on "Control Panel" > Click on Open.
- Click on "View network status and tasks" under "Network & Internet".

- Click on "Change adapter settings"
- Right click the network adapter the laser is connected to > Click on "Properties".

If there are multiple icons in this window, the correct one should be labeled "ethernet"; it usually has the little network connector icon. Note that it may also have a red "X" if it's disconnected or not properly configured. - Select the Internet Protocol Version 4 (TCP/IPv4) option > Click "Properties button".

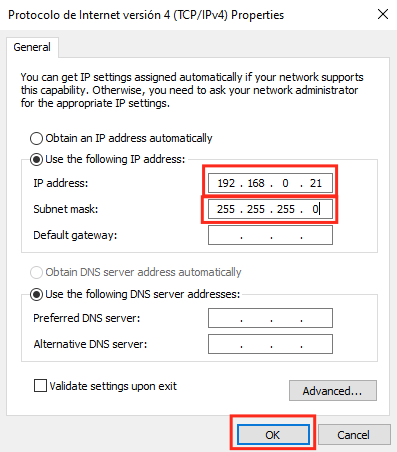
- In this windows the configuration happens:
- Write the desired IP address for the computer to the "IP address" box (i.e. 192.168.0.21).
- Write "255.255.255.0" (without quotes) to the "Subnet mask" box.
- Click "OK" button.
Check the connection
To check that the connection between computer and ShowNET device works, open the Admin Tool.If everything is fine you will see the IP address you've selected for your ShowNET device in the highlighted area:


Distributed brands: